Showing posts with label Home Decor. Show all posts

November 7, 2011

Christmas Décor

Pin It

I know Thanksgiving comes next but I couldn't help but to work on the paper mache cones. I've been staring at them for weeks. I got the cones from Michaels but I believe other craft stores sell them too.

The bases are just regular wood circles from craft stores. The stands are the wooden candle holders from Hobby Lobby.

Here's a really quick and simple wreath I made last night. The wire wreath I got from Michaels. I think it was $3. I wrapped burlap around the wreath then I added ribbons, bow, picture frame, and feathers for finishing touches.


Pin It


August 31, 2011

Cricut + Ikea Frame = Magical Home Decor


I love this Ikea frame. I want a dozen more to paint in all different colors. It would be fun to switch it up to match the holidays colors and such. Fab right?! Yeah I know!


So this is what I made last night. I had so. much. fun. OMG!
I used SCAL and Cricut expression to cut the letters and embellished with fabulous goodies I have in my scrap room!

This is one of my 2 most favorite quotes of all time. "Whatever you are be a good one." The other is my life's motto "Dream big."
Why? You know how I loooove free stuff! Well dreams are free! Why not dream big?!

Next project is "dream big" quote home decor.
Stay tuned.


April 10, 2011

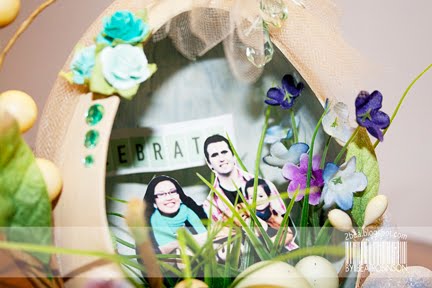
Easter Egg Shadow Box

I found some cheap paper mache egg from Hobby Lobby awhile back and I finally had time to jazz it up.

I will upload video via YouTube and explain how I made it.
So stay tune!


Go ahead and gather your supplies together. There should be some sale going on in your Spring/Easter section at your favorite crafts store!


September 30, 2010

Is it Halloween yet?


"Mom, is it Halloween yet?"
No.
"Mom, is it Halloween yet?"
No.
"Mom, is it Halloween yet?"
No.

*********

Here's a fun little project for your kids! I made a Halloween Countdown using 99 cents frame from Ikea to help us getting ready for Halloween. What's so cool about this frame is that there are 2 sides. Woo hoo! Now talking about cheap and classy lookin'. Great job Ikea!

Our lil' moster is so excited to help me flip the countdown thingy. Now if you would only flip one per day mister Z mommy would really appreciate it! =)

The part that took the longest?!?!? Would be......

Drumroll please?!


Yup you guessed it! The countdown thing-a-ma-jic!

This is a great way to get your kids involved. Make them punch 31 scallops, squares, circles, or whatever shape you want! Oh wait scratch that out. Make that 41 cuz mommy may need extra in case she can't stamp right! I'm not saying this from experience. Now bust out your No. stamps! Start stamping and embossing, stamping and embossing, and repeat the process. After awhile you may be saying some choice words but that's the beauty of us not living in the same house! LOL

No seriously it wasn't that bad. But I think I maxed out on stamping & embossing for today!


So is it Halloween yet?!


September 28, 2010

{Cello}brate Halloween

I saw the cutest Halloween cello bags at Michaels and had to get them. I had no idea what I was going to use them for. All I knew was I didn't want to put food in them.

This is what I came up with. The Halloween organizer for my inspiration board.


I had to throw up the fall colors on the board because where I live there's no fall or autumn. Sad I know! =(
Whenever I run out of creative juice that's one of many places I look to for inspiration.

This would be great to put on the fridge or locker too!

I'm so ready to {cello}brate Halloween with lots of sweets!

August 26, 2010

Bats Magical Chandelier Part II

Remember this?! I decided to add some bats to help us get into the Halloween Spirit around our home. I'm so over summer! This heat has got to go!

The bats are from the Happy Hauntings cartridge. I used DCWV black glitter cardstock. I cut a bunch of them and ran it through my sewing machine. Now you have some wicked bat chandelier action going on! Pretty simple huh? I like simple things and the simple things in life make me happy. Looking at these bats I'm ready to decorate the rest of my home in all things spooky!!!


August 22, 2010

Lurking Eyes Halloween Wreath


Are you ready for Halloween? It's hard to believe it's just around the corner.
I had so much fun making this wreath. The best part is the whole entire project costs less than $10!
Everything except the ribbons I got from Dollar Tree! I got the ribbons from Michaels. They might still be on sale if not use your coupons!

P.S. You will have to spray paint the wreath black! It came in natural wood. Have fun!

July 17, 2010

YouTube Inspiration


I got this idea from Rina and Jo from YouTube. I just happened to have one canvas left in my craft room. This is a really cute home decor project.

I painted the canvas with glimmer mist. I also defined the edges by stamping text around the frame. For more textures I added mesh material on the left side of the canvas and more laces on the bottom and on the right side of the frame. I made all of the flowers and leaves using fabric scraps.

I hope you all will give this a try. It's really fun and inexpensive if you are already a scrapbooker.


April 25, 2010

Need Mother's Day Gift Ideas?

Please let me share my other love...collecting vintage knickknacks! I was at Savers last night while hubby was putting our little stud to bed (I know I know...I'm a lucky girl.)
And L-O-O-K what I found! I was smiling ear to ear. These lovely tins are so darn cute! I paid under 2 bucks for both of them! Woo hoo! This is seriously addicting since you can get loads and loads of stuff for pennies! I love when I have a successful thrift store shopping day. I went to Goodwill earlier that day too and found some amazing vintage children books. Yay! That's for another project.

Aren't these flowers arrangement so perfect for the women in your life? Go hit up your local thrift store and hope that you can find one of these lovely tins. Say a little prayer before you go. Trust me it works. hehe
If she doesn't like flowers... (hmmm I personally haven't met one yet) you can always fill these tins up with some of her favorite things; ribbons, embellishments, sewing kits, buttons, yarn, etc. I wouldn't recommend food because you never know what was in those tins before.

If you are going to do flowers I would suggest to go with ONE type of flower and ONE color. It's more dramatic! Wouldn't you agree? I think so!

Alright, run don't walk to your local thrift shops!

March 28, 2010

Spring Shower

I made a flower lolly today for our table centerpiece. I'm going for a Spring Shower theme.
The crystals hanging over the flower make it look like it's raining.

A simple flower lolly can dress up any table! Give it a try!

March 25, 2010

Magical Chandelier


I just love how these magical little pom-poms look in my house! I so loooove the feeling I get when I walk into my kitchen! So magical! I think I'm going to make every color there is for every occasions. Now I'm ready for a dinner party. Bring it on!
Most likely you already have all the supplies. You won't believe that these are made from tissue paper! Yes tissue paper! Do not throw them away...
Well by now you know that I save everything!
The dangling things at the bottom are the crystals I got on clearance at Michael's awhile ago. They were in the jewelry section. I went today and couldn't find any more. So sad! If you see more please let me know. I am in love with them. They add that sophisticated spark to any projects.
Seriously don't they just scream magical spring???? If you make these pom-poms please share the pictures with me.
I also ripped out some old dictionary paper to use in this project as well.
Get the how-to here!

March 10, 2010

No Pastels Please!

Mister told me that he doesn't like Spring decoration because of the colors... PASTELS!
I guess pastels bunnies, eggs, flowers are just way too much for him. My brain was hurting trying to come up with something to decorate our house. I didn't want to spend a lot of money therefore I came up with this idea. I bought a book from the thrift store for like a buck. I think it turned out pretty cute! I did sneak in a few of the Spring colors but I don't think it screams pastels. Plus mister loves it which is a bonus! We are looking forward to Spring at our house!

This is how I constructed my wreath.

1. Cut a circular base using cardboard or anything sturdy.
2. Attach tulle or ribbon to the base. You want to do this now so the cones will cover it.
3. Cut pages out of your book.
4. Roll each page into a cone shape and hot glue to the circle base.
( I inked the edges of the paper - optional)
5. I have 3 rows of cones but you can have more or less it's up to you. It really depends on the size of your base. Leave some room in the center of the wreath for crumpled paper.
6. Crumple each page into a ball and hot glue to the center of the wreath
7. Decorate with buttons and butterflies (optional)

If you have any questions please email me or leave a comment with your email.