Showing posts with label Crafts. Show all posts

November 7, 2011

Christmas Décor

Pin It

I know Thanksgiving comes next but I couldn't help but to work on the paper mache cones. I've been staring at them for weeks. I got the cones from Michaels but I believe other craft stores sell them too.

The bases are just regular wood circles from craft stores. The stands are the wooden candle holders from Hobby Lobby.

Here's a really quick and simple wreath I made last night. The wire wreath I got from Michaels. I think it was $3. I wrapped burlap around the wreath then I added ribbons, bow, picture frame, and feathers for finishing touches.


Pin It


August 16, 2011

$1 wanna be printer trays

With a baby who knows how long it will take me to finish these trays. Don't you just love how I throw my baby under the bus? Sorry Jack, momma does love you! So I just wanted to jump on here real quick and let you know to run to your Dollar Tree before they are all gone! They have 3 different types. Of course I got one of each.

These will go on my craft room wall. I can't wait! I was so excited when I saw these!!! Have fun and please share some pictures with me when you are done.

Please email me the link so I can "linky link" it to your blog / youtube.

April 10, 2011

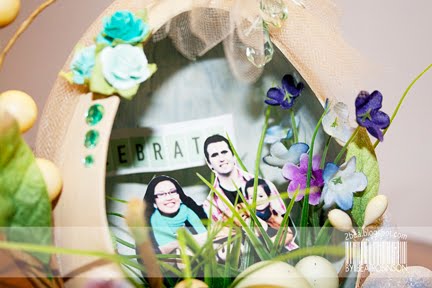
Easter Egg Shadow Box

I found some cheap paper mache egg from Hobby Lobby awhile back and I finally had time to jazz it up.

I will upload video via YouTube and explain how I made it.
So stay tune!


Go ahead and gather your supplies together. There should be some sale going on in your Spring/Easter section at your favorite crafts store!


October 13, 2010

Cutest Halloween Suckers On The Block

Ladies & gents,

Let me introduce you to Mister Greenie!
Isn't he the cutest sucker you've ever seen?!

Please note that if you are a sensitive person this project isn't for you.


Let me explain...
(please allow me to explain before you get mad at me for calling you "sensitive")


I'm assuming that you are making a bunch of mister Greenie and his friends to pass them around to the neighborhood kids, grandkids, your own lil' monsters, or kiddies at church. These lil' precious people are going to be sooooo excited and Mister Greenie's head is going to come off like a prom dress.

By that time you might be crying because so many hours went into this project (very cute project indeed.)


If you are not the sensitive type ... keep reading

(those that want to do this project)

My suggestion would be to use up your stash. Mister Greenie doesn't have to be perfect or "green." Make some Mister Orangie or Miss Purpley. If a little bit of glue shows who cares. The kids don't care. As long as you don't tape the wrapper shut. HAHA now that would be funny! All I'm saying is keep it moving. Make an assembly line and crank em out.


I used Mini Monsters cricut cartridge. Mister Greenie is on page 75.
I got 3 boxes out of 8.5" x 11"
Not bad huh?!

Now punch some holes on the bottom of the box, put a sucker in there, and tie tulle around it!

Happy Trick or Treatin' Kids!


September 30, 2010

Is it Halloween yet?


"Mom, is it Halloween yet?"
No.
"Mom, is it Halloween yet?"
No.
"Mom, is it Halloween yet?"
No.

*********

Here's a fun little project for your kids! I made a Halloween Countdown using 99 cents frame from Ikea to help us getting ready for Halloween. What's so cool about this frame is that there are 2 sides. Woo hoo! Now talking about cheap and classy lookin'. Great job Ikea!

Our lil' moster is so excited to help me flip the countdown thingy. Now if you would only flip one per day mister Z mommy would really appreciate it! =)

The part that took the longest?!?!? Would be......

Drumroll please?!


Yup you guessed it! The countdown thing-a-ma-jic!

This is a great way to get your kids involved. Make them punch 31 scallops, squares, circles, or whatever shape you want! Oh wait scratch that out. Make that 41 cuz mommy may need extra in case she can't stamp right! I'm not saying this from experience. Now bust out your No. stamps! Start stamping and embossing, stamping and embossing, and repeat the process. After awhile you may be saying some choice words but that's the beauty of us not living in the same house! LOL

No seriously it wasn't that bad. But I think I maxed out on stamping & embossing for today!


So is it Halloween yet?!


September 28, 2010

{Cello}brate Halloween

I saw the cutest Halloween cello bags at Michaels and had to get them. I had no idea what I was going to use them for. All I knew was I didn't want to put food in them.

This is what I came up with. The Halloween organizer for my inspiration board.


I had to throw up the fall colors on the board because where I live there's no fall or autumn. Sad I know! =(
Whenever I run out of creative juice that's one of many places I look to for inspiration.

This would be great to put on the fridge or locker too!

I'm so ready to {cello}brate Halloween with lots of sweets!

September 9, 2010

Grown-Up Bib

I'm a 'grown-up' who loves to wear bib... bib necklace! Noticed I said grown-up... I didn't say mature. hehe
What do you get when you combine felt + satin + ribbon + rhinestones + buttons + brads?

You get this cutesy necklace bib!

I used sizzix die to cut the 2 felt flowers.

August 26, 2010

Bats Magical Chandelier Part II

Remember this?! I decided to add some bats to help us get into the Halloween Spirit around our home. I'm so over summer! This heat has got to go!

The bats are from the Happy Hauntings cartridge. I used DCWV black glitter cardstock. I cut a bunch of them and ran it through my sewing machine. Now you have some wicked bat chandelier action going on! Pretty simple huh? I like simple things and the simple things in life make me happy. Looking at these bats I'm ready to decorate the rest of my home in all things spooky!!!


August 22, 2010

Lurking Eyes Halloween Wreath


Are you ready for Halloween? It's hard to believe it's just around the corner.
I had so much fun making this wreath. The best part is the whole entire project costs less than $10!
Everything except the ribbons I got from Dollar Tree! I got the ribbons from Michaels. They might still be on sale if not use your coupons!

P.S. You will have to spray paint the wreath black! It came in natural wood. Have fun!

July 27, 2010

Make Your Own Appliques Using Cricut


I've given up on cutting fabric in my Cricut months ago. I tried using butcher paper and Heat'n Bond and that didn't turn out too great for me. I've decided to give this project one more try using a Pellon Clear Fuse 800 and it went so much better. I got it at JoAnns. I don't remember whose idea this was but I know she's from Cricut message board. I couldn't find her blog. Sorry!

Please read instruction that comes with the clear fuse 800. Trust me you don't want to screw this up. It will tell you what settings your iron should be and how long you should iron this baby for.

Tips from me:

-1- Cut the clear fuse 1/2" smaller than your fabric; why? you don't want to get the sticky stuff all over your iron and ironing board.
-2- Put rough side of the fuse to the back side of the fabric. Make sure to press firmly with iron instead of moving the iron around like a mad woman.
-3- Let the fabric cool completely before peeling. Patience will pay off! Trust me...
-4- TEST the cut on old fabric or ugly fabric you bought back in 1999 and thought it was the cutest thing ever.
-5- Make sure there aren't any bubbles when you place the fabric on the mat. Smooth them out with the scrapper or your fingers.

Cricut Settings:
(Edited on July 28th.)
-1- Blade Depth = 4
-2- Pressure = 4
-3- Speed = 4
-4- Multi cut = 2

Note: Before you send me hate emails please try -1/+1 on your settings. Every machine is a bit different! If it still doesn't work email me.

As you know I'm all about the details! I added some lace around the neckline. The ruffle stem and leaf is from the same ribbon I had in my stash. I added the rhinestones for the finishing touches. I used the EK Success hot-fix tool for this project. Would I recommend it? No! It works fine but not great. The darn rhinestones got stuck all the time and so I had to use flat tip instead. Since this is my blog I'm going to take 2 seconds to vent. Their customer service sucks! I emailed the company and never heard back from them. There! I just had to let y'all know that!

Moving on...

I would try this one instead! It's by Darice. Now before you send me another hate email please note that I have not tried this tool. Just heard great things about it from other people. Take it for what its worth.

I hope you'll give this project a try.

If you have any other tips for cutting fabric using Cricut please let me know.


July 24, 2010

Camera Strap Cover!

Here's another sewing project inspiration for you! How many of us own a camera or cameras?!?! I know several people who has the exact camera as we do!
I decided to spice things up a bit.


No more losing your camera at the crop or swamp or let alone at your home. Can you imagine not being able to locate your camera when this baby is on? I didn't think so! Problem solved! So get your sewing on my lovelies! If you don't sew.... take a deep breath do not panic. I found some amazing online stores that sell them. I do not know these people. I just like the covers. Take a lookie look here, here, and here!


July 17, 2010

YouTube Inspiration


I got this idea from Rina and Jo from YouTube. I just happened to have one canvas left in my craft room. This is a really cute home decor project.

I painted the canvas with glimmer mist. I also defined the edges by stamping text around the frame. For more textures I added mesh material on the left side of the canvas and more laces on the bottom and on the right side of the frame. I made all of the flowers and leaves using fabric scraps.

I hope you all will give this a try. It's really fun and inexpensive if you are already a scrapbooker.